
経緯
プログラムで創作的なことをしたいと思った。
人間が描くような絵は無理でもモザイクアートなら作れるのでは?
と思い検索したところ、ヒットしたので自分でも作ってみることに。
処理の流れ
大雑把に以下のようにした
- 目標となる画像をタイル化する
- 素材に使用するすべての画像のカラーヒストグラムを計算する
- タイルの数だけ以下の処理をループする
- タイル1枚のカラーヒストグラムを計算する
- タイル1枚当たりのカラーヒストグラムと素材に使用する全ての画像のカラーヒストグラムを比較する
- タイル画像に一番近い値を示した素材画像をタイル画像と置き換える
実装
ほんとは図があった方が分かりやすいのだろうが準備できなかったので割愛する
試し試しやった部分もあるので実装とコメントが違っていたり
無理やりデータ持たせたりしたけど、温かい目で見ていただければ...
全量
# coding:utf-8
from PIL import Image,ImageFilter
import subprocess
import os
import random
import math
import time
import numpy as np
import glob
import cv2

#==============設定===================
#素材画像の入っているフォルダ
SourceDir = R"xxxxx"

#目標となる画像
GoalImage = R"xxxxxx.jpg"

#出力の名前
OutputImage="output.jpg"

#素材の画像のサイズ(読み込み時にここで指定したサイズに変換される)
SourceImageSize=(60,40)

#ターゲット画像の倍率
TargetZoom=11

# 画像使用制限
used_count = 3
#=====================================

# 目標画像のタイル化
# org_image : PILで.open()した画像
# height : 素材画像の縦サイズ
# width : 素材画像の横サイズ
#
# return : RectList タイル
def __create_tile(org_image,height,width):

    # PPIL.Image.open()で読み込んだ画像データを渡すと
    # 形状shapeが(行(高さ), 列(幅), 色(チャンネル))の三次元の配列ndarrayが得られる
    w, h = org_image.size
    RectList=[]
    for y in range(0, math.floor(h / height) + 1):
        for x in range(0, math.floor(w / width) + 1):
            height2 = y * height
            width2 = x * width
            crap_img = org_image.crop((width2, height2, width2 + width, height2 + height))
            # crap_img.show()
            RectList.append((crap_img,width2,height2))
    return RectList

# ヒストグラムを計算する
# image : 画像ファイル
# return : hist_vec ヒストグラムのベクトル
def __clac_hist(img):

    hist_list = []
    color = ['r','g','b']
    images = np.asarray(img)
    # カラーヒストグラムはRGBそれぞれ計算する
    # そのため、3回ループしている
    for i in enumerate(color):
        hist_list.append(cv2.calcHist([images],[i[0]],None,[256],[0,256]))
    return hist_list

if __name__=="__main__":

    startTime=time.time()

    # 目標画像を開きリサイズ
    target=Image.open(GoalImage)
    target=target.resize(tuple(math.floor(i*TargetZoom) for i in target.size))

    # 動画撮影
    # fourcc2=cv2.VideoWriter_fourcc(*fourcc)
    # v=cv2.VideoWriter(OutputMovie,int(fourcc2),Framerate,target.size)

    # 元画像のタイル化
    print("%s:タイルリストを生成開始"%(str(time.time()-startTime)))
    tiles = __create_tile(target,SourceImageSize[1],SourceImageSize[0])
    print("%s:タイルリストを生成完了"%(str(time.time()-startTime)))

    # 素材画像ファイル名を取得
    # 全素材画像をリサイズする
    file_paths = glob.glob(SourceDir+"\\*")
    src_hist_dict = {}
    print("%s:全素材画像ヒストグラムを計算開始"%(str(time.time()-startTime)))
    for file_path in file_paths:
        file_name = file_path.split("\\")[-1]

        # print(file_name)

        # 画像のopenでエラーの場合は次の画像へ
        try:
            src_image =  Image.open(file_path).resize(SourceImageSize)
        except Exception:
            continue
        # src_image.show()
        src_hist_dict[file_name] = [src_image,__clac_hist(src_image),0]
    print("%s:全素材画像ヒストグラムを計算完了"%(str(time.time()-startTime)))

    # カラーヒストグラム計算 素材画像

    Target=Image.new("RGB",target.size,255)

    # タイルの数だけループ
    print("%s:モザイクアート生成開始"%(str(time.time()-startTime)))
    while(len(tiles) > 0):
        result = []

        print("残りタイル:" + str(len(tiles)))
        r=random.randrange(len(tiles)) # タイルの中からランダムで1つ選択
        tileRect=tiles[r]
        del tiles[r]
        # タイルのカラーヒスとグラムを取得する。
        tile_hist = __clac_hist(tileRect[0])
        # RGBを同じベクトルにする
        tile_hist = np.array(tile_hist)
        tile_hist = tile_hist.reshape(tile_hist.shape[0] * tile_hist.shape[1], 1)

        # 元画像のタイルと素材のヒストグラムを比較
        for file_name,src_hist in src_hist_dict.items():
            src_hist = np.array(src_hist[1])
            src_hist = src_hist.reshape(src_hist.shape[0] * src_hist.shape[1], 1)

            d = cv2.compareHist(tile_hist, src_hist, cv2.HISTCMP_INTERSECT)
            result.append([d,file_name])
        result.sort(reverse=True) # ソート

        # ファイルの置き換え
        Target.paste(src_hist_dict[result[0][1]][0],(tileRect[1],tileRect[2]))

        # 画像使用カウントアップ
        src_hist_dict[result[0][1]][2] = src_hist_dict[result[0][1]][2] + 1

        # カウントが一定値に達したら
        if src_hist_dict[result[0][1]][2] == used_count:
            del src_hist_dict[result[0][1]]

        # print("ファイル名 : " + result[0][1])
        # print("x座標 : " + str(tileRect[1]))
        # print("y座標 : " + str(tileRect[2]))

        # Target.show()

    print("%s:モザイクアート生成完了"%(str(time.time()-startTime)))
    Target.save(OutputImage)
    # v.release()
目標となる画像をタイル化する
# 目標画像のタイル化
# org_image : PILで.open()した画像
# height : 素材画像の縦サイズ
# width : 素材画像の横サイズ
#
# return : RectList タイル
def __create_tile(org_image,height,width):

    # PIL.Image.open()で読み込んだ画像データを渡すと
    # 形状shapeが(行(高さ), 列(幅), 色(チャンネル))の三次元の配列ndarrayが得られる
    w, h = org_image.size
    RectList=[]
    for y in range(0, math.floor(h / height) + 1):
        for x in range(0, math.floor(w / width) + 1):
            height2 = y * height
            width2 = x * width
            crap_img = org_image.crop((width2, height2, width2 + width, height2 + height))
            # crap_img.show()
            RectList.append((crap_img,width2,height2))
    return RectList
ここでは目標画像を素材画像サイズで分割している。
例えば目標画像サイズが1000×900、素材画像のサイズを20×20にした場合
縦50枚,横45枚の画像が並ぶことになる。
素材に使用するすべての画像のカラーヒストグラムを計算する
# ヒストグラムを計算する
# image : 画像ファイル
# return : hist_vec ヒストグラムのベクトル
def __clac_hist(img):

    hist_list = []
    color = ['r','g','b']
    images = np.asarray(img)
    # カラーヒストグラムはRGBそれぞれ計算する
    # そのため、3回ループしている
    for i in enumerate(color):
        hist_list.append(cv2.calcHist([images],[i[0]],None,[256],[0,256]))
    return hist_list
カラーヒストグラムを計算するのにOpenCV(ソースコードで示す「cv2」)というライブラリを使用する。
PILで開いた画像をOpenCVに直接突っ込めないため、numpyのasarrayに変換している。
変換した画像データをOpenCVのcalcHist()に引数として渡す。
タイルの数だけ以下処理をループする
タイル1枚のカラーヒストグラムを計算する
これは素材画像のカラーヒストグラムを計算したメソッドの再利用
タイル1枚当たりのカラーヒストグラムと素材に使用する全ての画像のカラーヒストグラムを比較する
# 元画像のタイルと素材のヒストグラムを比較
for file_name,src_hist in src_hist_dict.items():
    src_hist = np.array(src_hist[1])
    src_hist = src_hist.reshape(src_hist.shape[0] * src_hist.shape[1], 1)
    d = cv2.compareHist(tile_hist, src_hist, cv2.HISTCMP_INTERSECT)
    result.append([d,file_name])
素材画像全てとタイル画像のカラーヒストグラムを比較する。
カラーヒストグラム計算の個所でrgbそれぞれのヒストグラムを計算していたため
それをまとめる必要がある。
src_hist = src_hist.reshape(src_hist.shape[0] * src_hist.shape[1], 1)ここについては自分の勉強不足もあり、正直よくわかっていない。
当初うまくいかずネットの海を漂っていてたら見つけたため記載。
引用元メモっていたのですが、どこに保存したかわかんなくなった...
compareHist()でカラーヒストグラムを比較し、結果をListに格納していく
タイル画像に一番近い値を示した素材画像をタイル画像と置き換える
result.sort(reverse=True) # ソート
# ファイルの置き換え
Target.paste(src_hist_dict[result[0][1]][0],(tileRect[1],tileRect[2]))
比較結果をソートし、一番タイル画像と近い素材画像を置き換えている。
課題
以下が課題
- 毎回素材画像全てのカラーヒストグラムを計算しているため何回も作り直す場合は時間がすごくかかる。
結果も全てメモリに持ってしまうため、タイル画像数、素材画像数が増えると動作が著しく遅くなる。
⇒ メモリではなく、ファイルに出力すればよいかも
作ったもの
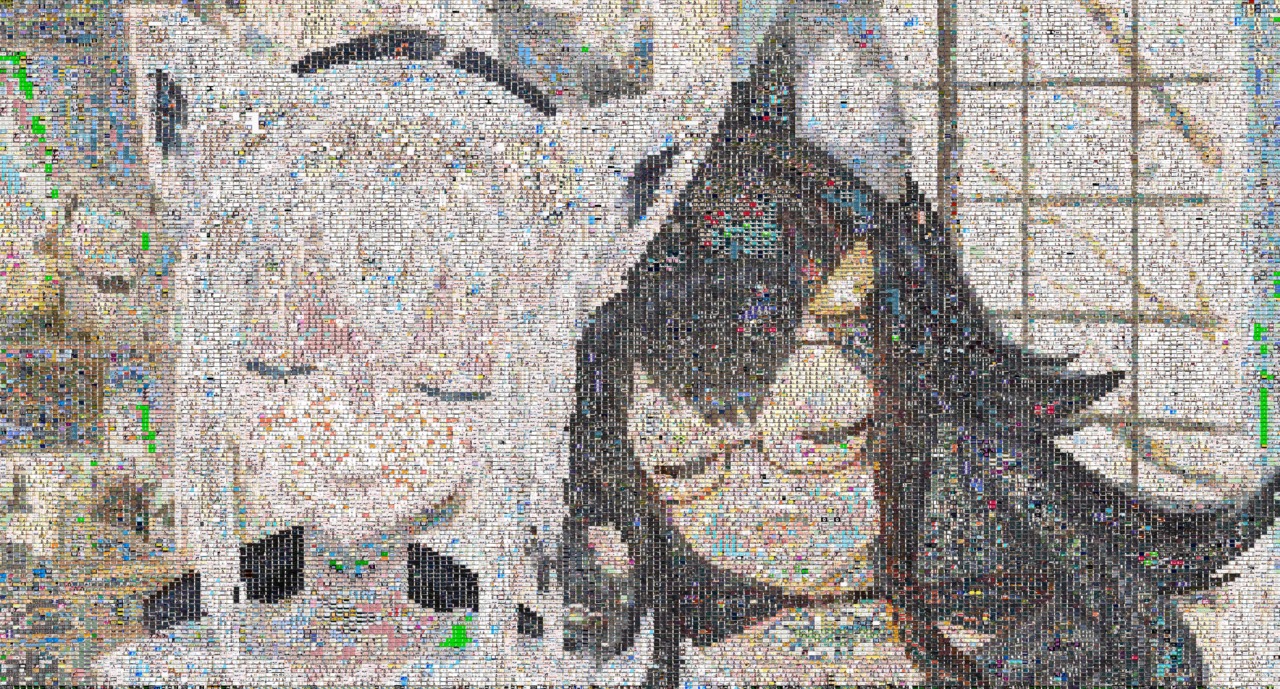
vtuberのお二人
@shirakamifubuki
@ookamimio
画像サイズ 11880 × 6391 の約30MB
この画像を作成するために用意した素材数は77,121枚、容量120GB分
まとめ
モザイクアートのプログラムでした!
まあ実際できたし、これでいったんOKということで
気が向いたら、ブラシアップします。
単純作業にお悩みではありませんか?
何百とあるワードを検索してファイルにまとめたり 数ある商品情報から条件にあるものだけ目で探してリ...
その単純作業プログラムで解決できるかもしれません。 もしよろしければ単純作業からの解放をお手伝いさせてください。
詳しくは以下のページからDM、または見積もり相談お願い致します。